Let Claude Edit Your Website: Connecting InboundSavvy to Claude Code
A non-technical guide to setting up InboundSavvy's MCP integration with Claude Code - one prompt, a few clicks, and AI starts building your website.

If you've heard about MCP (Model Context Protocol) and AI-powered website editing but assumed it required being a developer - good news: it doesn't.
InboundSavvy's MCP integration with Claude Code lets you connect your website to AI without touching a terminal, writing a config file, or understanding JSON. You paste one prompt, click Allow, and let Claude handle everything else.
This guide walks you through the full setup from scratch. By the end, you'll be able to say things like "Create a Services page in the same style as my homepage" - and watch Claude build it in seconds.
What You'll Need
- An InboundSavvy account with at least one website set up
- Claude Code installed on your computer (available at claude.ai/code)
- About 5 minutes
That's it. No terminal. No scripts. No developer experience required.
Step 1: Get Your MCP Token from InboundSavvy
Every InboundSavvy website gets its own MCP token - a secure key that lets Claude access and edit only that specific site. Think of it like a hotel key card: it opens only the doors it's meant to.
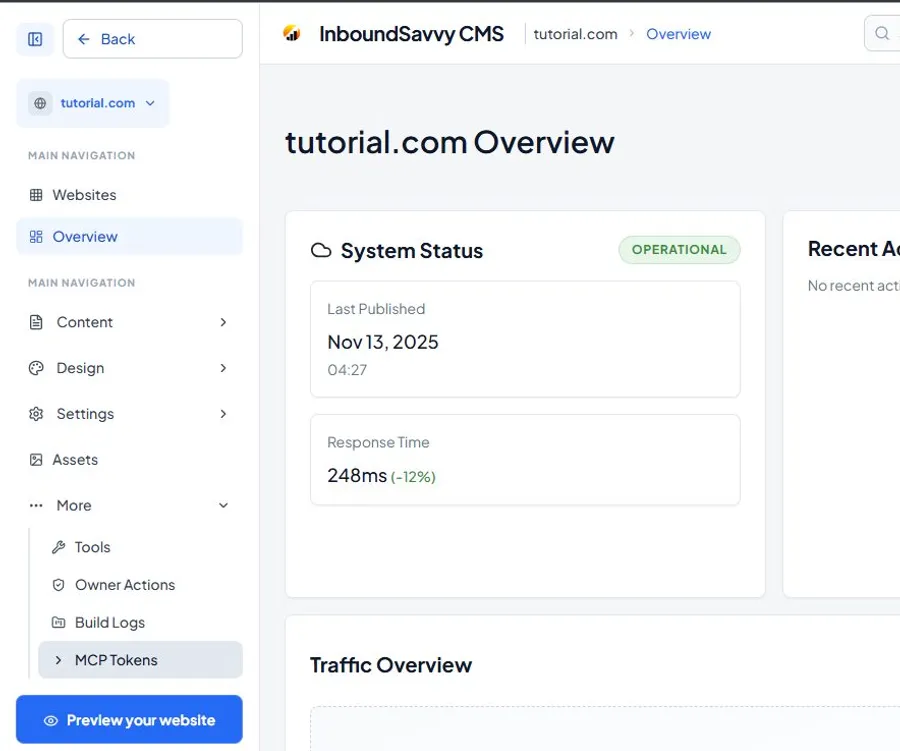
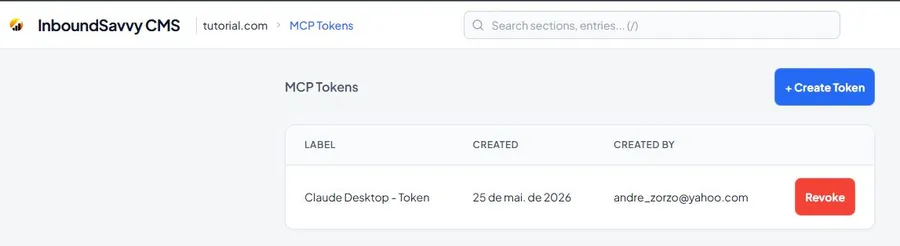
1. Log into InboundSavvy CMS and select the website you want to connect.
2. In the left sidebar, click More to expand the menu.
3. Click MCP Tokens.
You'll land on the MCP Tokens page. If it's your first time, it will be empty.
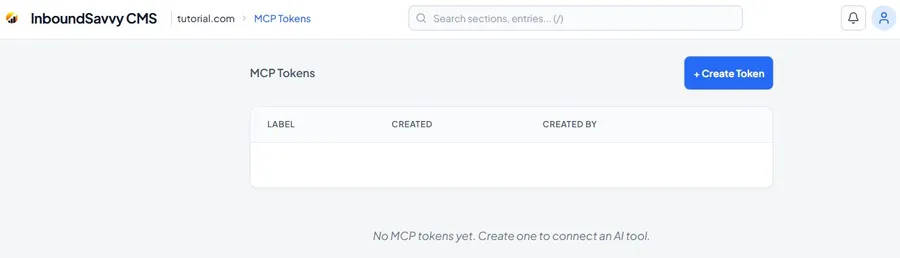
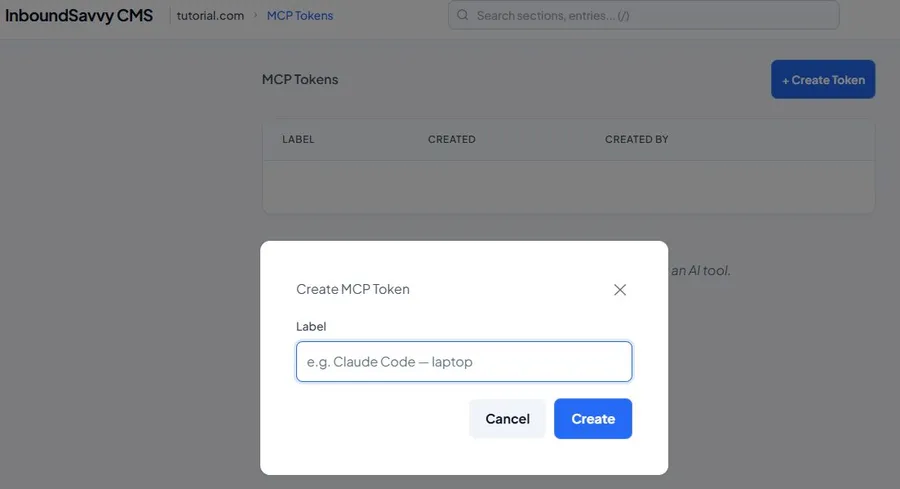
4. Click + Create Token.
5. Give your token a label so you remember where it's used - something like "Claude Code - my laptop" works perfectly.
6. Click Create.
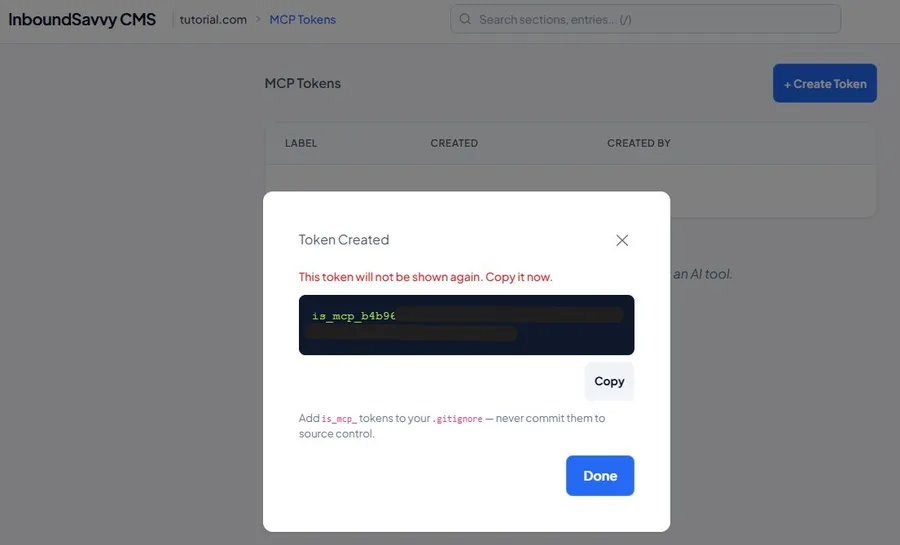
⚠️ The token is shown only once. Copy it immediately by clicking the Copy button before closing this dialog. The token starts with is_mcp_ and is a long string of characters - keep it somewhere safe (like a notes app) until you paste it into Claude.
If you ever need to revoke a token - for example, when you change computers - you can do it from the MCP Tokens page at any time.
Step 2: Open Claude Code in Your Website Folder
Claude Code works best when you open it from the folder where you keep your website's content and images. This doesn't need to be a code project - it can be any folder on your computer that you associate with the website.
Open a new Claude Code session and make sure the Working directory shown at the bottom of the screen is your website folder. This is important - the config file Claude creates will live in this folder and connect it to your InboundSavvy site.
Once the right folder is selected, you're ready for the next step.
Step 3: Paste One Prompt - Claude Does the Rest
Instead of running scripts in a terminal, you paste a single prompt into Claude Code. Claude reads the setup instructions from our GitHub repository, installs the skill, creates the config file, and sets up your .gitignore - all automatically.
Copy this prompt and replace [YOUR_TOKEN] with the token you copied in Step 1:
I want to connect my InboundSavvy website to Claude so I can improve it with AI. Please follow the setup instructions from this repo: https://github.com/InboundSavvy/Inboundsavvy-webmaster - install the skill and create the .mcp.json file in the current directory. My MCP token is: [YOUR_TOKEN]
Paste it into Claude Code and press Enter.
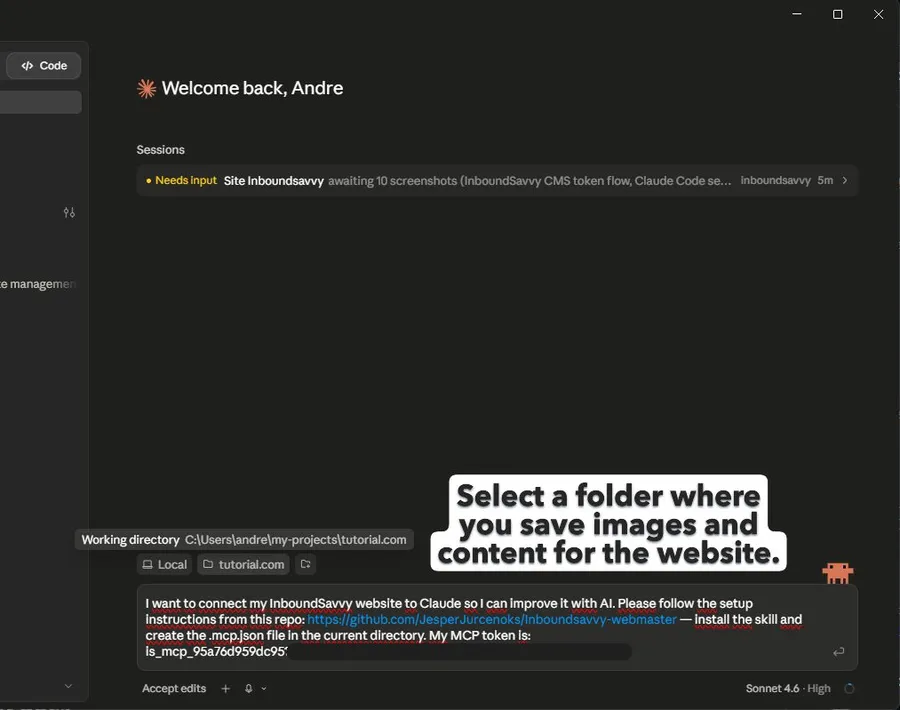
Claude will immediately start working: it reads the GitHub repository, downloads the skill instructions, and prepares the necessary files.
Step 4: Click "Allow" When Asked - It's Safe
During setup, Claude will ask for your permission before writing files to your computer. This is a security feature - Claude never modifies your files without explicit approval.
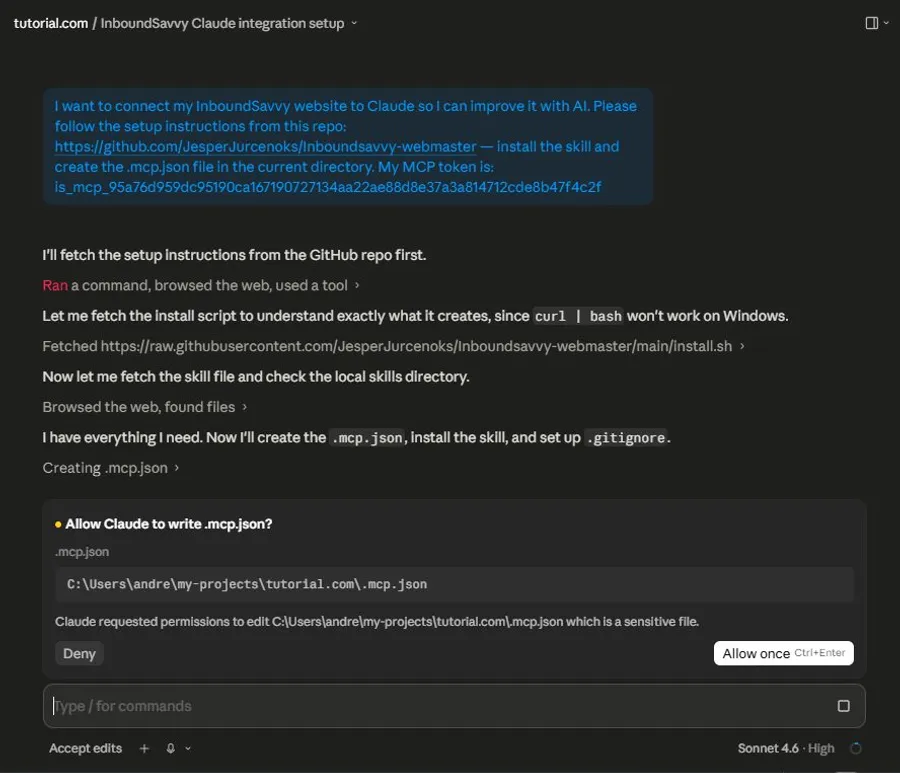
When you see the dialog "Allow Claude to write .mcp.json?", click Allow once. This is completely safe - Claude is creating the configuration file that links your website folder to InboundSavvy's MCP server using the token you provided.
You may see similar permission prompts for other files (like .gitignore). Go ahead and allow those too.
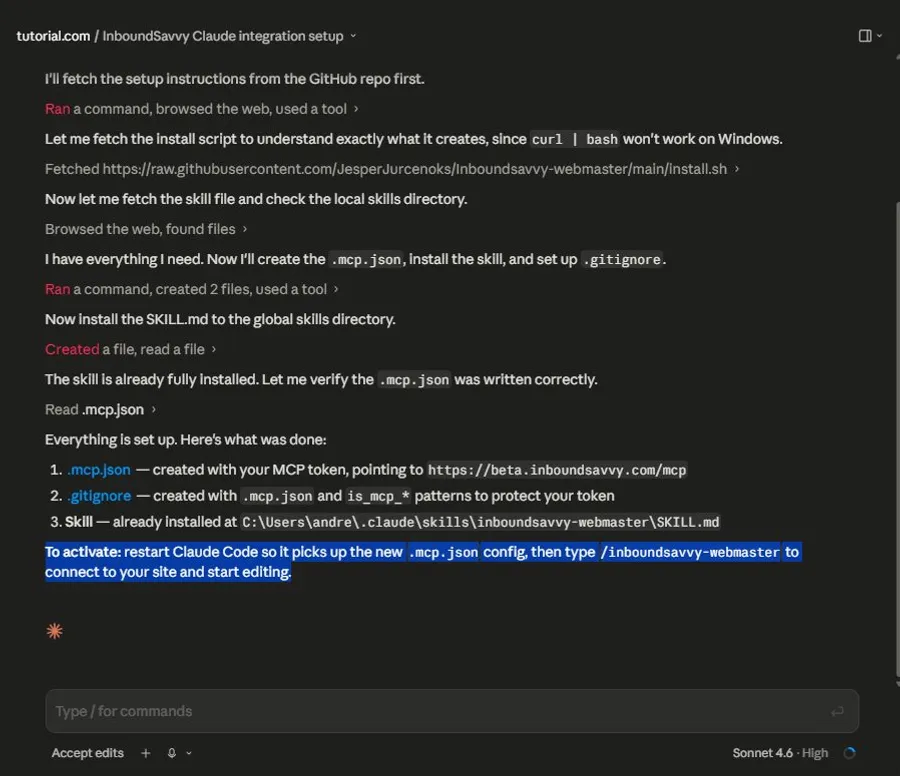
Once done, Claude confirms everything that was set up:
1. .mcp.json - your site's config, pointing to InboundSavvy's MCP server
2. .gitignore - protecting your token from being accidentally shared
3. Skill - the InboundSavvy Webmaster assistant, installed globally
You'll also see this key instruction highlighted in blue: Restart Claude Code so it picks up the new .mcp.json config, then type /inboundsavvy-webmaster to connect.
Step 5: Restart Claude Code and Activate the Skill
Restart Claude Code now - this is required. Claude Code reads the .mcp.json config file on startup, so the restart is what connects it to your InboundSavvy website.
Once restarted with your website folder open, type /inboundsavvy-webmaster in the prompt box.
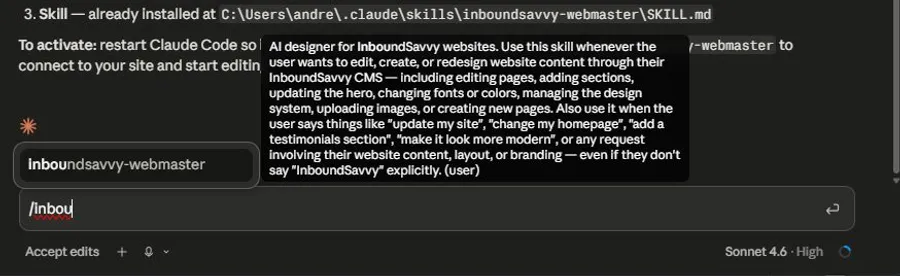
It will appear as an autocomplete suggestion - select it and press Enter.
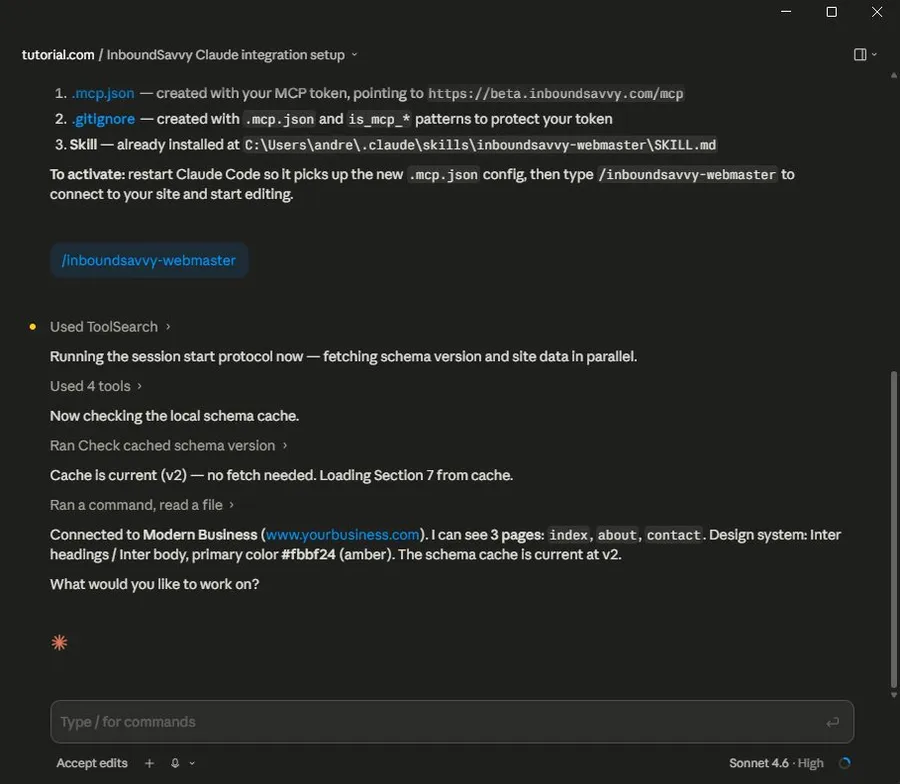
Claude connects to your InboundSavvy website and introduces itself with a full summary:
- Your website's name and URL
- All the pages it can see
- Your design system (fonts and colors)
From this moment, Claude is your AI co-editor - fully aware of your website's visual language and ready to build.
Now Start Building - In Plain Language
You don't need technical knowledge to direct Claude - just describe what you want. Here are some prompts to get you started:
- "Create a Services page in the same style as my homepage"
- "Add a testimonials section to my About page"
- "Update the hero headline to say [new tagline]"
- "Make all CTA buttons use my primary brand color"
For example, here's what happens when you ask Claude to create a new page:
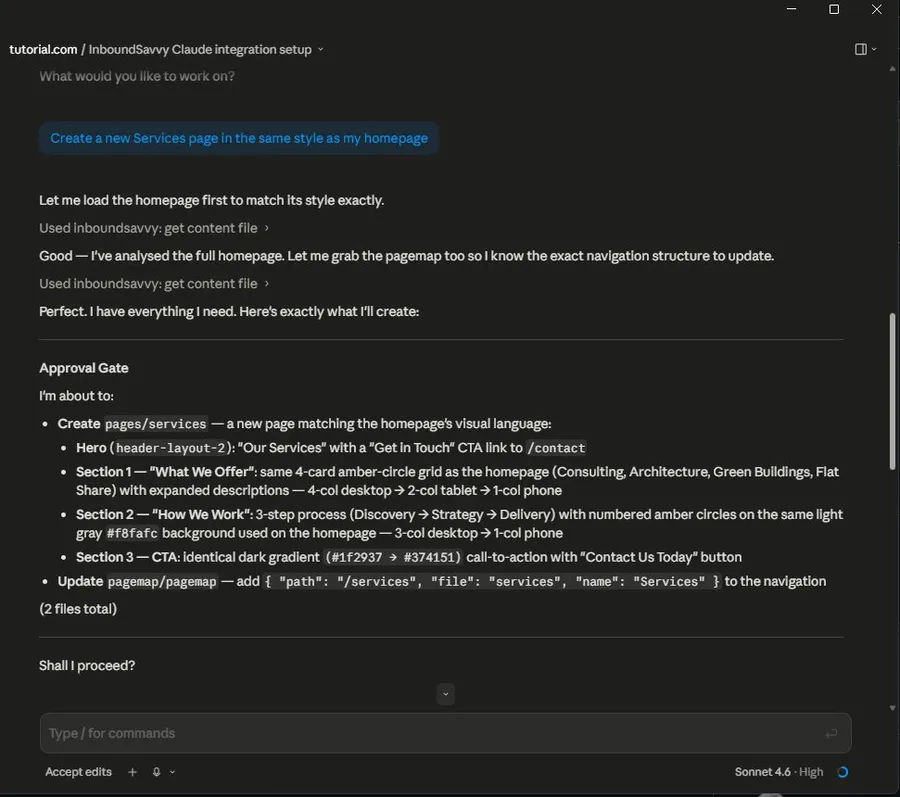
Before making any changes, Claude shows you an Approval Gate - a detailed plan of everything it's about to do. You can review it, ask for adjustments, or simply say "yes, proceed."
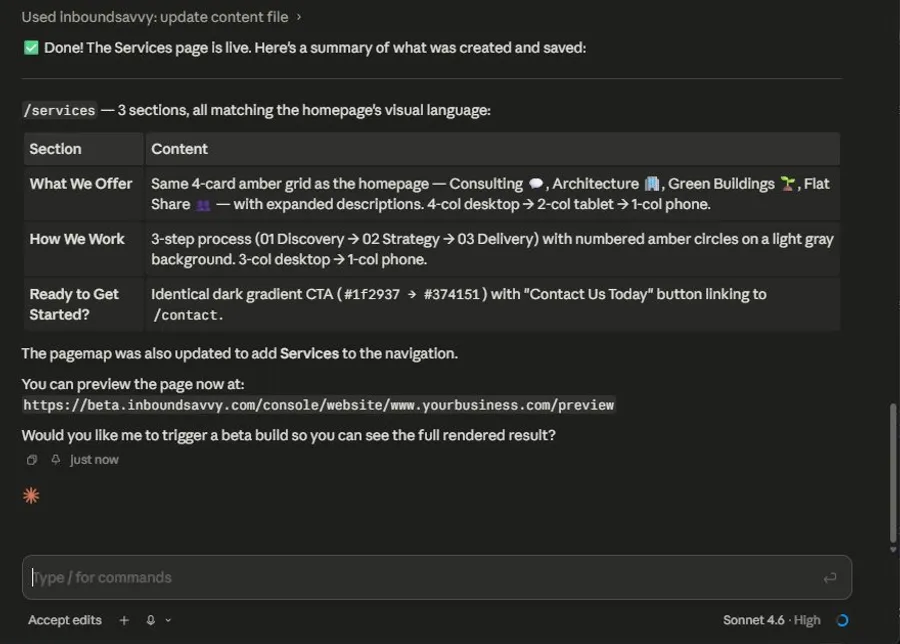
Once approved, Claude builds the page, updates your navigation, and confirms what was created. The result is immediately previewable inside InboundSavvy CMS - no waiting, no deployment pipeline.
The gap between "I have a website" and "I have a website that's actively improving" used to require a developer on call. With InboundSavvy's MCP integration and Claude Code, that gap closes to a single prompt.
Your token is set. Your skill is installed. Claude knows your brand. Now go tell it what to build.
Already set up? Share what you built - we'd love to feature the best examples in a future post.
By Andre de Castro Zorzo
Next in the series
How to fix a website that breaks on a phone
Your desktop rankings are computed from the phone rendering. Google indexes with Googlebot Smartphone, so what a phone cannot reach is not indexable.
2026-08-18
Google picked a different version of your page: fixing duplicate URLs and canonicals
Your page is indexed. Google just indexed a different URL of it than the one you promote and track. Pick one form, redirect the rest, make the signals agree.
2026-08-18
How to find and remove a noindex tag or robots.txt block that keeps your site out of Google
Your site is not missing from Google. It is being refused, on your own instruction. Three mechanisms can issue it, and two leave nothing in your HTML.
2026-08-18
Only your homepage is indexed: how to get Google to find the rest of your site
Google indexes what it can reach. If only your homepage is indexed, your pages are not being outranked: they are not being found. Internal links come first.
2026-08-18
How to get backlinks for a small business
Of the nine reasons your site is missing from Google, links are the one you control least. Fix the other eight first, then claim the links you are owed.
2026-08-18
How to get Google to index a new website
If your site went live in the last few weeks, the likely explanation is the boring one: Google has not got to you yet. What shortens the wait, and what does not.
2026-08-18
How to make your website faster and pass Core Web Vitals
Compressing your images will not fix this. Three numbers decide whether Google calls your site fast, and two are set by your architecture, not your assets.
2026-08-18
How to show up in local Google search when you serve a town
Your website is not your entry on the map. The map pack is fed by a Google Business Profile, a separate record you must claim and verify to compete on it.
2026-08-18
My page is indexed but gets no traffic: how to make it answer the question
Your page is not missing from Google. It is present and unwanted. Search Console tells you which problem you have: not being shown, or shown and not chosen.
2026-08-18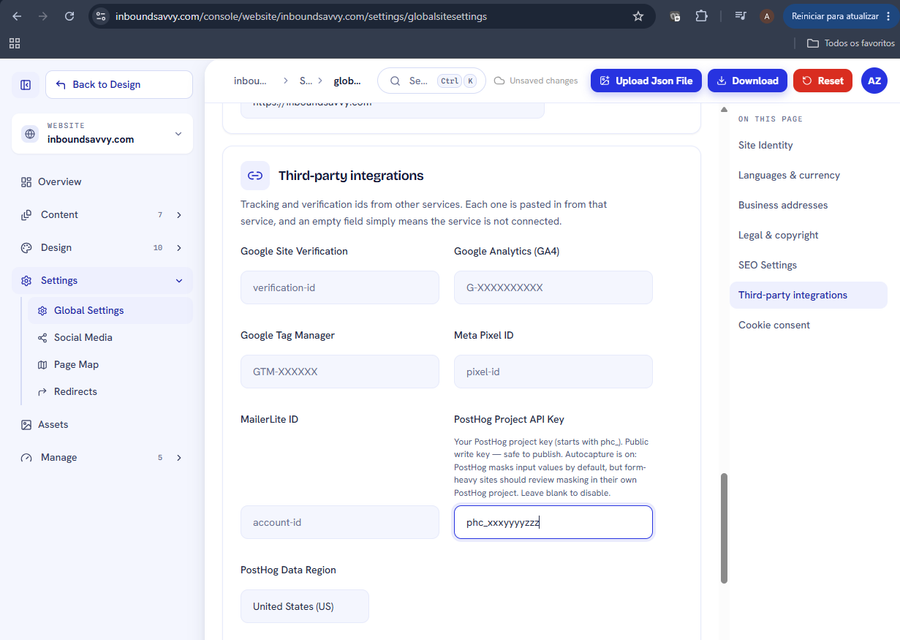
Set Up PostHog Analytics for Your Website
PostHog shows what visitors actually do on your site. InboundSavvy has it built in: one token, one dropdown. Includes how to connect PostHog's MCP server so your AI assistant can query the data.
2026-08-05
How to Get Your Small Business Found on Google in 2026
Getting found on Google changed with AI Overviews and AI Mode. Here's what actually moves the needle for a small business in 2026 - in plain English, no jargon.
2026-07-01
Why Isn't My Website Showing Up on Google? (9 Reasons + Fixes)
Nine reasons a small-business site does not appear in Google, each with the exact check that identifies it and the actual repair. Including what Search Console and Lighthouse each tell you, and why they disagree.
2026-06-28
The Small-Business Website SEO Checklist for 2026
SEO for a small business comes down to a handful of things done well. Here's a practical 2026 checklist, grouped by what each item actually does for you.
2026-06-25Other articles
How to fix a website that breaks on a phone
Your desktop rankings are computed from the phone rendering. Google indexes with Googlebot Smartphone, so what a phone cannot reach is not indexable.
2026-08-18Google picked a different version of your page: fixing duplicate URLs and canonicals
Your page is indexed. Google just indexed a different URL of it than the one you promote and track. Pick one form, redirect the rest, make the signals agree.
2026-08-18How to find and remove a noindex tag or robots.txt block that keeps your site out of Google
Your site is not missing from Google. It is being refused, on your own instruction. Three mechanisms can issue it, and two leave nothing in your HTML.
2026-08-18Only your homepage is indexed: how to get Google to find the rest of your site
Google indexes what it can reach. If only your homepage is indexed, your pages are not being outranked: they are not being found. Internal links come first.
2026-08-18How to get backlinks for a small business
Of the nine reasons your site is missing from Google, links are the one you control least. Fix the other eight first, then claim the links you are owed.
2026-08-18How to get Google to index a new website
If your site went live in the last few weeks, the likely explanation is the boring one: Google has not got to you yet. What shortens the wait, and what does not.
2026-08-18How to make your website faster and pass Core Web Vitals
Compressing your images will not fix this. Three numbers decide whether Google calls your site fast, and two are set by your architecture, not your assets.
2026-08-18How to show up in local Google search when you serve a town
Your website is not your entry on the map. The map pack is fed by a Google Business Profile, a separate record you must claim and verify to compete on it.
2026-08-18My page is indexed but gets no traffic: how to make it answer the question
Your page is not missing from Google. It is present and unwanted. Search Console tells you which problem you have: not being shown, or shown and not chosen.
2026-08-18Set Up PostHog Analytics for Your Website
PostHog shows what visitors actually do on your site. InboundSavvy has it built in: one token, one dropdown. Includes how to connect PostHog's MCP server so your AI assistant can query the data.
2026-08-05How to Get Your Small Business Found on Google in 2026
Getting found on Google changed with AI Overviews and AI Mode. Here's what actually moves the needle for a small business in 2026 - in plain English, no jargon.
2026-07-01Why Isn't My Website Showing Up on Google? (9 Reasons + Fixes)
Nine reasons a small-business site does not appear in Google, each with the exact check that identifies it and the actual repair. Including what Search Console and Lighthouse each tell you, and why they disagree.
2026-06-28The Small-Business Website SEO Checklist for 2026
SEO for a small business comes down to a handful of things done well. Here's a practical 2026 checklist, grouped by what each item actually does for you.
2026-06-25